DIY Leslie Rotating Speaker
The Leslie Rotating Speaker – a holy grail of weird and wacky vintage music gear. This is one of those things that seems to have fallen into a lost ravine of history. I find that most musicians today have never heard of it, let alone seen one. Let’s dive in and explore exactly what this is and hear what it sounds like because… I built one!
Note: Vintage or analog gear IS NOT better than modern, and it doesn’t make you play better. However, it’s imperfect and a little cooky. There are a sea of options with digital plugins, emulators, effects, and programs available that sometimes it’s overwhelming just to start. Having a piece of tangible gear in front of you really narrows down your field of possibility and forces you to get creative with what you have. For me personally, I like playing analog (or vintage) gear because it helps me write and get in the zone.
History:
The rotating speaker (or Leslie) was first innovated by Donald Leslie in the late 1930s. It was originally designed to help an electric organ sound more like an authentic pipe organ. The Leslie was soon adopted by guitarists and swelled to popularity in the 1960s and 1970s with artists like Jimi Hendrix and Pink Floyd using it on their records. Since then, the Leslie has seen a dramatic fall from popularity mostly due to its clunky size and the availability of guitar pedals that can kind of replicate what it sounds like. Vintage Leslie speakers are nearly impossible to find nowadays as they weren’t made with very robust materials. The ones that exist really belong in a museum. If someone sells an original Leslie, it goes for multiple thousands of dollars. Yeah – I can’t afford that.
So What Is It?
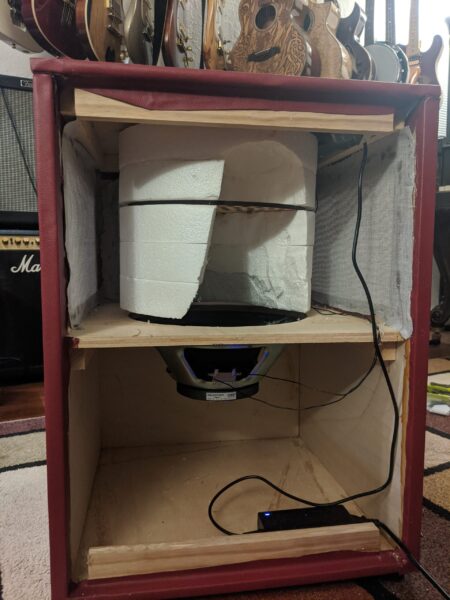
The Leslie is a speaker cabinet, usually larger than a medium-sized guitar or bass amplifier. Internally, a molded cardboard baffle (or drum) is suspended over a speaker. This baffle has a chunk missing and is connected to a small motor that allows it to spin. The majority of the baffle blocks sound traveling upwards from the speaker and encourages it to exit the cabinet through the bit that is missing. When the baffle spins, the cavity throws sound around the cabinet and the room. This creates the Doppler Effect – that thing that happens when you hear sirens on the road, and as they get farther from you, it sounds like the pitch goes down and gets distorted. The result is a watery, warbly tremolo-like effect that sounds absolutely psychedelic.
The Build:
I stumbled upon this amazing DIY article from Premier Guitar when I was searching for a way to build my own Leslie. It is pretty thorough and served as the template for what I did. If you would like to replicate this build, start with this article. I’d say that this project rates as follows:
- Time Commitment: Medium. This would take a full weekend if you don’t take breaks like I did.
- Difficulty: 7/10 with no experience, 4/10 if you understand basic carpentry and electronic wiring.
- Frustration: 5/10 with experience, but my notes should help lower that number.
- Satisfaction with End Product: 9/10. My only grumbles are with cosmetic issues and things out of my control.
Note: The article is a great starting point, but don’t get too bogged down with the details. I used it as a loose template and everything worked out great!
Issues that I Had:
Check this part out if you’d like to build your own! Here’s a list of the steps that were problematic and how I would recommend doing this better next time. I’m comparing my experience to the article listed above:
- The parts listed in the article were fairly difficult to find. I had absolutely no luck finding a cake dummy out of styrofoam that is as big as the article suggested. Instead, I hot glued several layers of thin styrofoam together to make the complete baffle. For some reason, styrofoam is expensive.
- The motor was also more costly (and larger) than I expected. I had to hollow out the center of the baffle to accommodate the motor. On the plus side, the motor that I used is very quiet and is capable of going very fast.
- Speaking of fast, the PWM controller that I used allowed the motor to spin way faster than what is usable. I ended up soldering a 200k resistor between the output pin (pin 3) of the potentiometer and the lead going to it in order to slow down the motor control. Before I did this, less than 10% of the pot sweep was usable before it got to be too fast. Now, the entire sweep works and sounds musical. *see footnote*
- I decided to wrap the cabinet in vinyl tolex-like material. This was my first time wrapping a cabinet from start to finish. I can’t state enough how miserable the glue was that I used. I chose a thin glue that is intended for vinyl flooring, mostly because it was cheap and in a small container that wouldn’t create a ton of waste. It adhered to the cabinet and the wrap well, but EVERYTHING in my house got sticky. It also has a ridiculous cure time. I finished applying glue over a week ago, and there are parts of the wrap that can still be pushed around. When I build another cabinet, I’ll likely just use a natural wood finish. If there is glue involved, it will be of better quality.
- I didn’t plan ahead with the electronics and controls for the outside of the cabinet. This is mostly because I didn’t decide what I wanted to do until it was finished (should I build a spring reverb in the base? Should there be LEDs? Does it need a second input jack?). After testing the speaker and hearing how awesome it sounds with the basic setup, I had to attempt to cut and drill through ¾” plywood on the finished product with paddle bits. Ick. I got lucky, but that could have gone badly.
- The article hints at the importance of centering the baffle on the motor’s spindle, but it gravely understates the frustration of that process. I originally made a thick cardboard sheet that held up the styrofoam and spun on the motor’s shaft, but it wasn’t strong enough to prevent the baffle from wobbling at high speeds. This wobble caused a TON of vibration in the cabinet and frankly made it unusable. (It also led me down an annoying rabbit hole learning about how to balance spinning objects and how static balance is different than dynamic balance and… I don’t know, I didn’t pay attention in high school physics.) I ended up using a wooden disc with perforations that allow the sound to pass through. This was cut on a laser machine, so I know that the center is true. Even with this, the baffle still wobbles and the cabinet shakes at high speeds. I don’t know how to attempt this most accurately with hand tools, and I would plan on making several baffles before settling on the one that works best.
*footnote*: There is a sweet spot with the speed of rotation. There is very little musical difference in the last 15% of the potentiometer sweep (after adding the 200k resistor). It's worth experimenting with 100k or a smaller value. There is also a faint electronic whine that can be heard with the use of the resistors. It is less pronounced with smaller resistance values.
The Final Product:
Overall, I’m very pleased with my DIY Leslie Cabinet! Unlike the original vintage models, this does not have any onboard amplification and is only a speaker. My signal chain starts with my guitar, then goes to any effect pedals that I want to use. It then goes to my Fender tube amp, but I bypass the amp’s speakers and send the signal to the Leslie. This means that I get to enjoy the EQ and gain controls of the amp! The Leslie is plugged in, but I can turn it on and off with an onboard switch which is mounted next to the speed control and the input jack. It’s a lot larger than I anticipated, but I’m very glad that I made it because it does sound quite unique.
So How Does It Sound?
I’m surprised by how unique the sound actually is. Many pedals attempt to replicate the sound of the Leslie, but I haven’t heard anything that is absolutely accurate yet. I’m convinced that is because of the way that the cabinet reacts with the room. The natural reverb, echo, and Doppler Effect decay that happens with the air is the secret sauce that can’t be easily replicated in a pedal yet. Granted, I’m not sure that the sound is so unique that it warrants making a big Leslie cabinet. I definitely plan on keeping it and making some cool recordings with it, though!
If you’re looking for a Leslie subsitute, I’d recommend one of my favorite pedals – the Walrus Audio Julia. This one packs a big punch because it includes the “Lag” control which detunes the delayed sound of the guitar. It’s not quite like the Doppler Effect, but it adds that watery shimmer that makes the Leslie so unique.
Sound Sample: (see bottom of page)
Here’s a sound recording of my DIY Leslie in action! This is a clean tone with the aforementioned signal chain, no pedals are used. There is also no EQ or mixing applied.
The recording was taken with an SM57 microphone mounted in the room before going straight into my audio interface. My guitar is a double humbucker setup with DiMarzio pickups.
For a cleaner and more usable sound in a mix, I am excited to try recording this in stereo or with several different mics placed throughout the room at different heights. The Leslie causes sound to swirl around you, and this wacky trait is a bit lost in mono.
Conclusion:
I hope that you learned something cool about the Leslie Rotating Speaker, and maybe you’ll try to build one someday! Stay tuned (pun intended) for the next Knowledge Blog, and keep on making art!
