Acoustic Drums 101
There’s no way around it – drums are a confusing instrument for beginners and intermediate players alike. Check out this article to learn how to properly set up an acoustic kit, avoid damage, and most importantly, protect your ears!
Recommended Pieces
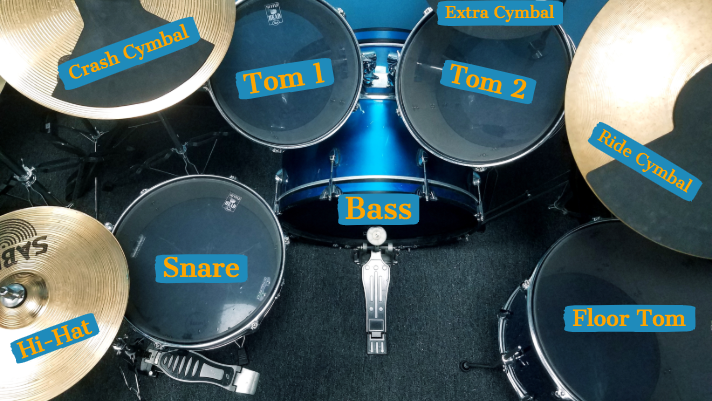
Acoustic drums come in all kinds of crazy varieties and set-ups. Most famous drummers mix-and-match their sets to make complete custom kits! For most music genres and levels of playing from amateur to professional, you will likely need the following pieces and their relevant hardware:
One bass (also called kick) drum.
One snare drum.
One hi-hat cymbal.
One crash cymbal.
One floor tom.
One mounted high tom.
Many kits and packages are available that come with two mounted toms. Kits may also offer a ride cymbal or another crash cymbal. Any extra parts that you can obtain within your price range is generally a good thing! Be aware that “complete” kits frequently do not come with cymbals. Triple check product descriptions to ensure that the kit comes with ALL necessary hardware, cymbals, and actual drums so that there aren’t any surprises after it is delivered. If you plan to piece together your own custom set, be wary – the price quickly ads up.
*If you are purchasing a set from a private seller, spend the extra money and get the delivery insured by USPS or other mail services! It will save you a ton of potential heart-ache.*
Traditional Setup
As you or your student develop as a drummer, a specific style of playing will be developed. Until then, I recommend to use the traditional set-up that most drummers use for playing, seen in the pictures below.

Be sure to place the entire drum set on a rug or carpeted area. Otherwise, the pieces will move and scratch the floor as you play!
The snare drum should be as flat and level as possible. Likewise, the floor tom should be flat and on the same plane as the snare drum to make playing fluid and easy. All cymbals, with the exception of the hi-hat, should slightly slope downwards towards the player. Any mounted toms may have a gentle angle applied to make playing comfortable. Most drummers play with a higher stool height so that they are above the drums. Adjust the general height of the set with this in mind. The player’s knees should never bend less than a ninety-degree angle while seated and playing.
How to Tune the Heads
Learning how to properly tune drum heads is an art in itself, but use these basic directions to get you started! First, find the drum key that likely came with your set. If you don’t have one, purchase one here. Put the drum on one of the rim lugs and gently turn clockwise to tighten it. Only complete several small turns. Then, repeat the process on the lug that is directly across from the one on which you started. Always tune all drum heads in a star pattern to evenly disperse the tension. As the drum gets tighter, repeat the process with the first lug and continuing until the head is as tight as you like. Use a stick to gently tap on the head as you tune.
If you are a perfectionist or a professional, tap on the head and near the lugs to hear slight variations in pitch. Tighten the lowest pitch lugs until the drum is resonating with the same tone when struck near every lug and in the center. This step is not necessary for beginners or unless you are playing a show or recording. Properly tuning the drums will make the kit sound better, though.
Mesh Heads and Mutes
Most people are wary of acoustic drums because they are so loud! If the noise worries you, or if you live in close-proximity housing to your neighbors, mutes are in order for your kit. Drum mutes refer to strips of rubber that lay on the drum pieces and muffle vibrations. Some affordable but quality mutes can be found here. For cymbals, you may also use these mutes that cling to the metal and greatly stifle noise. Regardless, I highly recommend purchasing mesh heads for the drums. They are relatively inexpensive and will last a long time if proper care is taken! They drastically reduce the sound of the drum and feel just like the normal heads when playing. Be aware that heads come in various sizes. To determine what size you need, measure the diameter of the drum at its widest point without the rim. Approximations are okay – go with the head size that is closest to your set.
Bass drum mutes and mesh heads can be purchased, but you can often get away with stuffing the bass drum with blankets and towels. Experiment to find out how much is needed to suit your sound reduction needs!
Drum Warnings
Drums are extremely sturdy. After all, they’re designed to take a beating! However, there are several ways to damage a drum set:
Be careful not to over-tighten the drum heads. Doing so could ruin the heads and strip the lugs.
When adjusting hardware, loosen the joints first! Failing to do so will strip the joints and will render the hardware useless. Always check to see if there is a thumb screw that can be loosened before you bend hardware.
Never play on the resonant heads. These are the heads that are attached to the bottom of each drum. When using real acoustic heads, the resonant heads do a lot to fill out the sound and make the drums sound great. If the resonant heads get damaged or dented from playing, they can’t do their job properly.
Never leave drums or pieces of the set in a hot car! It’s best to leave them out of direct sunlight as well. If drums get too hot, the wrapping on the shells can warp, crack, and render the drums useless. This damage is not repairable.
Keep the drums away from water. Moisture is always deadly to acoustic instruments, and drums are no different.
Strike all cymbals properly. Cymbals are tough, but they can crack and break if they are repeatedly struck incorrectly. The sticks should never collide with the thin edge of the cymbal and exert force towards the center. All stick hits should come from above and pass downward towards the floor.
Ensure that the bass foot pedal is tightly fixed to the bass drum. It’s easy to accidentally kick the pedal through the bass drum head. The pedal can also cause abrasions to the head if it is too loose.
Recommended Accessories
Besides the drum set, you’ll need some accessories to make playing easier! You will certainly need several pairs of sticks. All drummers, especially beginners, should have a pair of 5A sticks in their arsenal. This is the best utilitarian stick and gets the job done for most genres. You will need several pairs as all drum sticks eventually chip and break from use. It is also recommended to purchase a comfortable and quality drum throne. You’ll be spending a lot of time sitting on it, so it needs to be cozy! Likewise, a music stand is necessary. Most drummers set their stand up close to their hi-hat so that the music is easily visible.
Lastly, reliable ear protection is vital. This is not an optional purchase. Playing acoustic, un-muted drums for any extended period of time will result in permanent hearing damage. I recommend using these earplugs as they do not block the sound but merely reduce the decibels. Noise-cancelling headphones or conventional earplugs may also be an option for your needs. Remember that you only get two ears and that hearing damage is not reversible.
Congratulations on taking your first step towards better drum playing! Best of luck, and have fun! Check out our other informative articles here, and subscribe to our vlog here to receive the newest content about the performing arts!


